Hey guy.. Today I will be showing you a really simple trick on how to design your own blog and create footer navigation tools with different tabs under the footer of your blog on blogger.com, but to have one you would have to be quite familiar with changing your HTML code, and employ a few workarounds. But no longer. Blogger has
wised up and made it very easy for us.
And as always there are various ways to go about it…. before rushing in straight to the subject matter, let me first give you a brief introduction about what navigation is and why is it important to have one.
wised up and made it very easy for us.
And as always there are various ways to go about it…. before rushing in straight to the subject matter, let me first give you a brief introduction about what navigation is and why is it important to have one.
"Do you know that you can create a free blog with no cost today and start making cool cash online"Click here to start
Navigation
These is the process of moving around a website or blog , the Internet. Also it's the process of monitoring and controlling the movement of your audience or visitors from one of your webpage or post to another.
Blog Nav is a vital tool for your blog, because it enables your visitors to easily move freely and access various content of your blog. Below are few important reason why you need a navigation tool for your blog.
IMPORTANT OF HAVING NAVIGATION TOOLS.
1.It makes your blog looks matured, professional and beautiful.
2.It allows easy access to all content of your blog,and enable your visitors to move free and navigate through your blog easily.
3.Mobile friendly.
4.Google appreciate and likes blog with good navigation system.
5.Having a good navigation system increase your chances of been ranked higher on Google Search results.
Well said right? Now you know the importance of having a navigation system on your blog, without wasting further time.... Here are the simple steps In setting up a "nav" on your blog footer.
- First things first, create a page,a good static pages to have for your blog are for example : a proper About page (about your blog and about you), a contact page, a page where your visitors can reach you, where you show off where you have been featured and which blog awards you have received. An about page, this page content a few description about what your blog is all about.
How to setup your pages:
- Click on page, which is on the left side(panel) of your blogger dashboard.
- Click on new page.
- Create the page; write the title and content of the page.
- On the right side of the opened new page you are creating, click>>post setting >>option>>Reader comment >> do not allow.
- Save and publish.
Step on how to setup nav on your blog
Step 1.Login into your blogger account with your email and password.
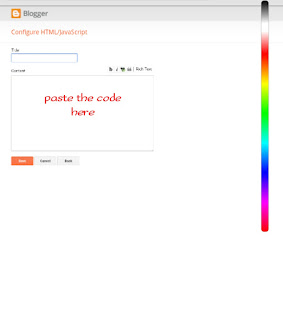
<center>|<a href="https://flashrealities.blogspot.com" /><span style="font-style:italic;"><font color="White"> <font size="5px;"> <span style="font-weight:bold;">Home</span></font> </font></span></a> | <a href="https://flashrealities.blogspot.com.ng/p/about-us.html" /><span style="font-style:italic;"><font color="white"> <font size="5px;"><span style="font-weight:bold;">About </span> </font> </font></span></a> |<a href="https://flashrealities.blogspot.com.ng/p/privacy-policy.html" /><span style="font-style:italic;"><font color="white"> <font size="5px;"> <span style="font-weight:bold;">Privacy </span></font> </font><span style="font-weight:bold;"></span></span></a> | <a href="https://flashrealities.blogspot.com.ng/p/blog-page_9.html" /><span style="font-style:italic;"><font color="white"> <font size="5px;"> <span style="font-weight:bold;">Contact-us </span></font> </font></span></a> </center>
Step 6. Edit this code and only change the URL links.....
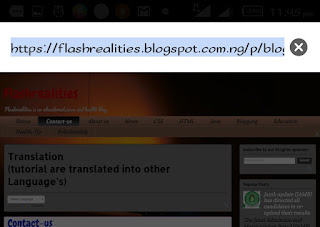
Eample: For the Home page>>copy and paste your blog home page URL link on the <a href="PASTE your blog URL HERE" />
Eample: For the Home page>>copy and paste your blog home page URL link on the <a href="PASTE your blog URL HERE" />
Do so for all the pages you want to add to your blog footer.
Also you could change the font size if you wish to, to your specific taste.
Also you could change the font size if you wish to, to your specific taste.
Step 7.Save it.
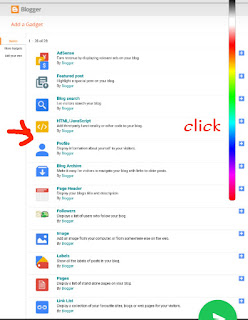
Step 8.Drop and Drag the HTML/JavaScript and place it on the footer of your blog.
Step 9.save arrangement.
Step 9.save arrangement.
After that is done preview and see the beautiful awesome change's .
Thanks for reading this article i hope this tutorial helps you create awesome footer navigation areas for your site, store or blog. Feel free to share , and if you have a topic or explanation you would like us to cover don’t forget to let us know about it in the comments.


0 comments:
Post a Comment